JavaScript was designed to run in a single-threaded environment, meaning multiple scripts cannot run at the same time. Consider a situation where you need to handle UI events, query and process large amounts of API data, and manipulate the DOM.
Javascript will hang your browser in situation where CPU utilization is high. Let us take a simple example where Javascript goes through a big loop −
<!DOCTYPE HTML>
<html>
   <head>
      <title>Big for loop</title>

      <script>
         function bigLoop(){
            for (var i = 0; i <= 10000; i += 1){
               var j = i;
            }
            alert("Completed " + j + "iterations" );
         }

         function sayHello(){
            alert("Hello sir...." );
         }
      </script>

   </head>
   <body>

      <input type="button" onclick="bigLoop();" value="Big Loop" />
      <input type="button" onclick="sayHello();" value="Say Hello" />

   </body>
</html>
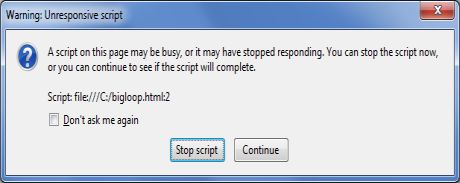
It will produce the following result −
When you click Big Loop button it displays following result in Firefox −
What is Web Workers?
The situation explained above can be handled using Web Workers who will do all the computationally expensive tasks without interrupting the user interface and typically run on separate threads.
Web Workers allow for long-running scripts that are not interrupted by scripts that respond to clicks or other user interactions, and allows long tasks to be executed without yielding to keep the page responsive.
Web Workers are background scripts and they are relatively heavy-weight, and are not intended to be used in large numbers. For example, it would be inappropriate to launch one worker for each pixel of a four megapixel image.
When a script is executing inside a Web Worker it cannot access the web page's window object (window.document), which means that Web Workers don't have direct access to the web page and the DOM API. Although Web Workers cannot block the browser UI, they can still consume CPU cycles and make the system less responsive.
How Web Workers Work?
Web Workers are initialized with the URL of a JavaScript file, which contains the code the worker will execute. This code sets event listeners and communicates with the script that spawned it from the main page. Following is the simple syntax −
var worker = new Worker('bigLoop.js');
If the specified javascript file exists, the browser will spawn a new worker thread, which is downloaded asynchronously. If the path to your worker returns an 404, the worker will fail silently.
If your application has multiple supporting javascript files, you can import them importScripts() method which takes file name(s) as argument separated by comma as follows −
importScripts("helper.js", "anotherHelper.js");
Once the Web Worker is spawned, communication between web worker and its parent page is done using the postMessage() method. Depending on your browser/version, postMessage() can accept either a string or JSON object as its single argument.
Message passed by Web Worker is accessed using onmessage event in the main page. Now let us write our bigLoop example using Web Worker. Below is the main page (hello.htm) which will spawn a web worker to execute the loop and to return the final value of variable j −
<!DOCTYPE HTML>
<html>
   <head>

      <title>Big for loop</title>

      <script>
         var worker = new Worker('bigLoop.js');
         worker.onmessage = function (event) {
            alert("Completed " + event.data + "iterations" );
         };

         function sayHello(){
            alert("Hello sir...." );
         }
      </script>

   </head>
   <body>

      <input type="button" onclick="sayHello();" value="Say Hello"/>

   </body>
</html>
Following is the content of bigLoop.js file. This makes use of postMessage() API to pass the communication back to main page −
for (var i = 0; i <= 1000000000; i += 1){
   var j = i;
}
postMessage(j);
This will produce following result −
Now let us keep hello.htm and bigLoop.js file in the same directory and try to access hello.htm using latest version of either Safari or Firefox.
Stopping Web Workers
Web Workers don't stop by themselves but the page that started them can stop them by calling terminate() method.
worker.terminate();
A terminated Web Worker will no longer respond to messages or perform any additional computations. You cannot restart a worker; instead, you can create a new worker using the same URL.
Handling Errors
The following shows an example of an error handling function in a Web Worker JavaScript file that logs errors to the console. With error handling code, above example would become as following −
<!DOCTYPE HTML>
<html>
   <head>

      <title>Big for loop</title>

      <script>
         var worker = new Worker('bigLoop.js');

         worker.onmessage = function (event) {
            alert("Completed " + event.data + "iterations" );
         };

         worker.onerror = function (event) {
            console.log(event.message, event);
         };

         function sayHello(){
            alert("Hello sir...." );
         }
      </script>

   </head>
   <body>

      <input type="button" onclick="sayHello();" value="Say Hello"/>

   </body>
</html>
Checking for Browser Support
Following is the syntax to detect a Web Worker feature support available in a browser
<!DOCTYPE HTML>
<html>
   <head>

      <title>Big for loop</title>

      <script src="/js/modernizr-1.5.min.js"></script>

      <script>
   function myFunction(){
         if (Modernizr.webworkers) {
            alert("Congratulation!! you have web workers support." );
         }

         else{
            alert("Sorry!! you do not have web workers support." );
         }
   }
      </script>
   </head>

   <body>

      <button onclick="myFunction()">Click me</button>

   </body>
</html>
This will produce following result −
Comments
Post a Comment