Windows Server 2012 codenamed Windows Server 8 is the most recent version of the operating system from Microsoft regarding server management. But it is not the last one, as the last one is Windows Server 2016. Officially it was released on August 1st, 2012 and is being sold as a commercial version only.

Improvements in Windows Server 2012
The major Improvements on this version are as follows −
- It is ready to be integrated with cloud systems and it still can maintain the classic features of local datacenters as a result Hyper-V Virtualization has new features Hyper-v replicas, it allows you to create virtual machines replications between clusters and storage systems.
- The Storage migration virtual disks can be moved to different physical storages, Virtual machine snapshots, virtual machines can be deleted from the Hyper-v and also from the virtual disks and it can be used directly without the need to shut down the virtual machine.
- The Core server installation easily switches to GUI installation without the need of reinstallation.
- The file server and storage service improvement is that it eliminates identical copies in the same volumes as such and saves space.
- The Storage pools and storage spaces allows you to group the hard disks to one or more storage pools then it allows to create virtual disks. It can add other disks to the storage pools and make available to the users without impacting them.
- The iSCSI Target Server can offer block storage to other servers and applications on the network using the iSCSI standard.
- Active Directory cloning can deploy additional domain controllers by cloning an existing virtual domain controller.
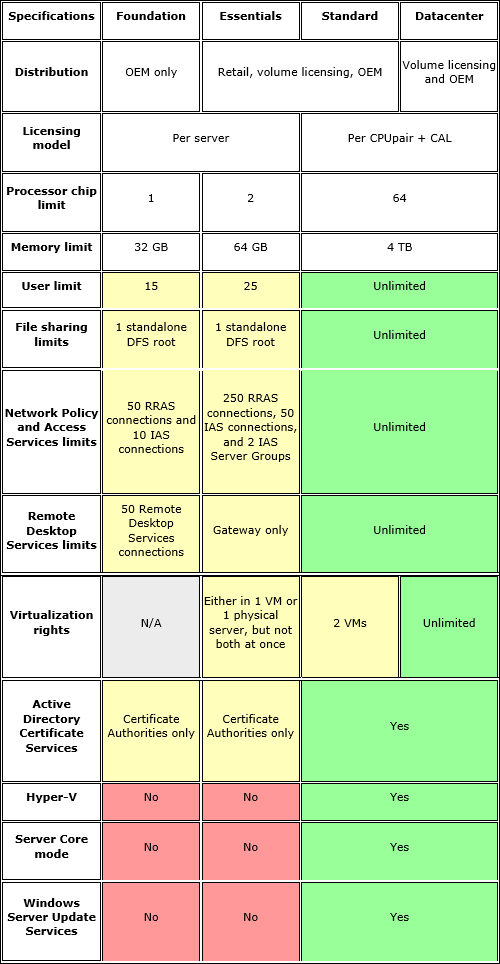
The Windows Server 2012 has four editions: Foundation, Essentials, Standard and Datacenter. Each one of them has their own limitation accept the Datacenter version which is also the most expensive one.
The following table will show what is the right one for your business needs −
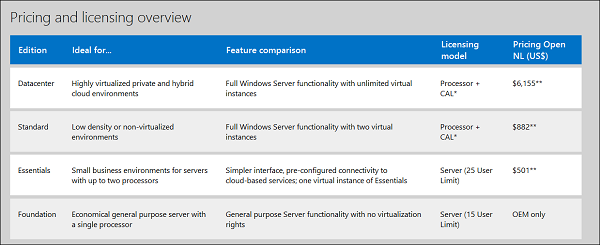
For finding out the cost of licensing you can click on the following link − https://www.microsoft.com/en-us/server-cloud/products/windows-server-2012-r2/purchasing.aspx
Comments
Post a Comment