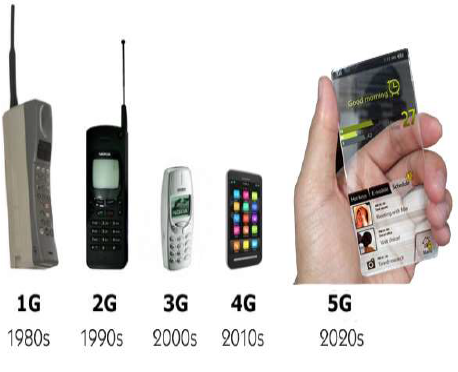
If we look back, we will find that every next decade, one generation is advancing in the field of mobile technology. Starting from the First Generation (1G) in 1980s, Second Generation (2G) in 1990s, Third Generation (3G) in 2000s, Fourth Generation (4G) in 2010s, and now Fifth Generation (5G), we are advancing towards more and more sophisticated and smarter technology.
Smarter Technology

What is 5G Technology?

The 5G technology is expected to provide a new (much wider than the previous one) frequency bands along with the wider spectral bandwidth per frequency channel. As of now, the predecessors (generations) mobile technologies have evidenced substantial increase in peak bitrate. Then — how is 5G different from the previous one (especially 4G)? The answer is — it is not only the increase in bitrate made 5G distinct from the 4G, but rather 5G is also advanced in terms of −
  • High increased peak bit rate
  • Larger data volume per unit area (i.e. high system spectral efficiency)
  • High capacity to allow more devices connectivity concurrently and instantaneously
  • Lower battery consumption
  • Better connectivity irrespective of the geographic region, in which you are
  • Larger number of supporting devices
  • Lower cost of infrastructural development
  • Higher reliability of the communications
As researchers say, with the wide range of bandwidth radio channels, it is able to support the speed up to 10 Gbps, the 5G WiFi technology will offer contiguous and consistent coverage − “wider area mobility in true sense.”

Comments

Popular posts from this blog

In this chapter, we will see how to enable remote desktop application. It is important because this enables us to work remotely on the server. To do this, we have the following two options. For the first option, we have to follow the steps given below. Step 1  − Go to Start → right click “This PC” → Properties. Step 2  − On Left side click “Remote Setting”. Step 3  − Check radio button “Allow Remote connection to this computer” and Check box “Allow connection only from computers running Remote Desktop with Network Level Authentication (recommended)” → click “Select Users”. Step 4  − Click Add. Step 5  − Type user that you want to allow access. In my case, it is administrator → click OK. For the  second option , we need to follow the steps given below. Step 1  − Click on “Server Manage” → Local Server → click on “Enable” or Disable, if it is Disabled.
Virtualization is one of the most important technology feature and Microsoft has invested on this and the responsible role is called as Hyper-V. Let us now see how to install the Hyper-V Role, for doing this we should follow the steps given below. Step 1  − To Install DNS role go to “Server Manager” → Manage → Add Roles and Features. Step 2  − Click Next. Step 3  − Select the  Role-based  or  feature-based installation  option → click Next. Step 4  − I will install a Local Hyper-V role as it will Select a server from the server pool → Next. Step 5  − From the Roles lists, check the Hyper-V Server role → click Add Features on the popup windows which show up and then → Next. Step 6  − Click Next. Step 7  − Choose your server’s physical network adapters that will take part in the virtualization → Next. Step 8  − Under  Migration , leave the default settings →  Next . Step 9  − Choose the...

HaydarOrac