Resource Monitor is a great tool to identify which program/service is using resources like program, applications, network connection and memory usages.
To open Resource Monitor, go to Server Manage → Tools.
Resource Monitor
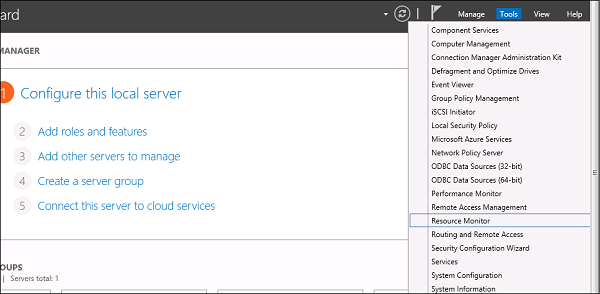
Click on “Resource Monitor”, the First Section is “Overview”. It tells how much CPU is consuming every application and on the right side of the table, it monitors in real time the chart of CPU usage. The Memory tells how much memory every application is consuming and in the right side of the table it is being monitored in real time in the chart of CPU usage.
The Disk tab splits it by the different hard drives. This will show the current Disk I/O and will show the disk usage per process. The network tab will show the processes and their network bytes sent and received. It will also show the current TCP connections and what ports are currently listening, IDs too.

Comments

Popular posts from this blog

In this chapter, we will see how to enable remote desktop application. It is important because this enables us to work remotely on the server. To do this, we have the following two options. For the first option, we have to follow the steps given below. Step 1  − Go to Start → right click “This PC” → Properties. Step 2  − On Left side click “Remote Setting”. Step 3  − Check radio button “Allow Remote connection to this computer” and Check box “Allow connection only from computers running Remote Desktop with Network Level Authentication (recommended)” → click “Select Users”. Step 4  − Click Add. Step 5  − Type user that you want to allow access. In my case, it is administrator → click OK. For the  second option , we need to follow the steps given below. Step 1  − Click on “Server Manage” → Local Server → click on “Enable” or Disable, if it is Disabled.
Virtualization is one of the most important technology feature and Microsoft has invested on this and the responsible role is called as Hyper-V. Let us now see how to install the Hyper-V Role, for doing this we should follow the steps given below. Step 1  − To Install DNS role go to “Server Manager” → Manage → Add Roles and Features. Step 2  − Click Next. Step 3  − Select the  Role-based  or  feature-based installation  option → click Next. Step 4  − I will install a Local Hyper-V role as it will Select a server from the server pool → Next. Step 5  − From the Roles lists, check the Hyper-V Server role → click Add Features on the popup windows which show up and then → Next. Step 6  − Click Next. Step 7  − Choose your server’s physical network adapters that will take part in the virtualization → Next. Step 8  − Under  Migration , leave the default settings →  Next . Step 9  − Choose the...

HaydarOrac