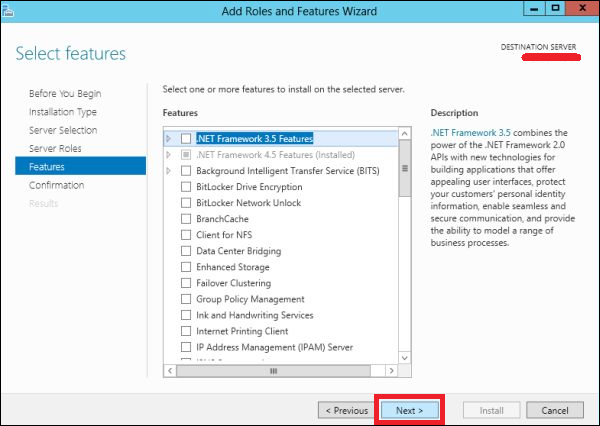
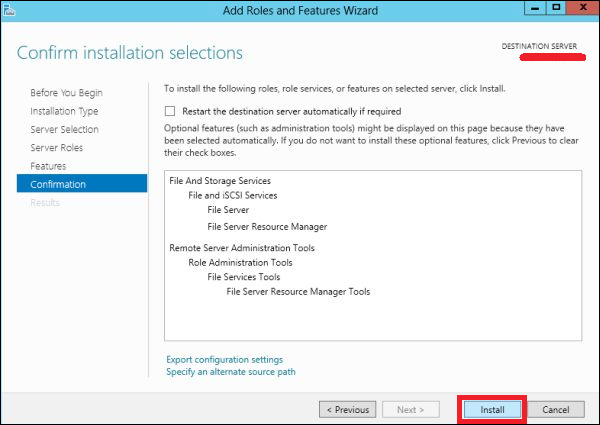
Like its previous versions, the present Windows Server 2012 version has a File Server Resource Manager Role. As you know, this is a role that helps system administrators to manage shared folders in the features link in setting up limits or file extension restrictions. To install it, we should follow the steps given below.
Step 1 − Go to Server Manager → Manage → Add Roles and Features → Next → Check on the Role-based or feature-based installation box → Check on the Select a server from the server pool box → Next.
Then, at the list of the roles find File and Storage Services and expand it. After this, expand the Files and iSCSI Services → Check on the File Server Resource Manager box and then a pop-up window will open.
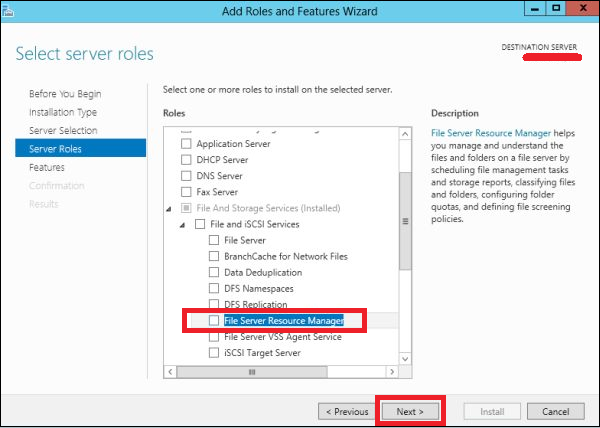
Files
Step 2 − Click on Add features and then → Next.
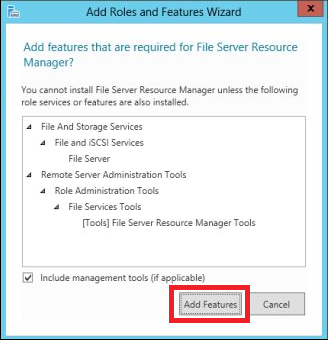
Click Add Features
Step 3 − Click the Next button.
Next Buttons
Step 4 − Click the Install button.
Install Button
Now that we installed the File Server Resource Manager, let us open it by following the path given below.
Step 1 − Click on Server Manager → Tools → File Server Resource Manager.
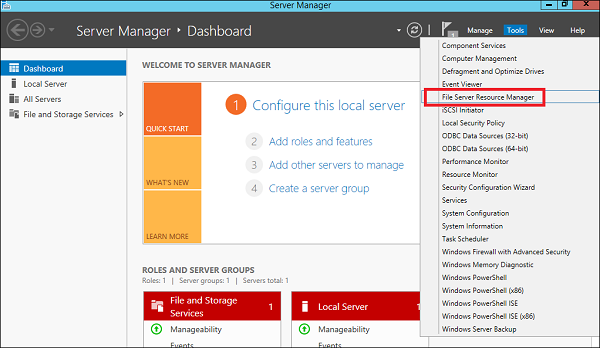
File Server Resource Manager
To set quota to a folder, we should follow the steps as below.
Step 2 − On the left panel click on Quota Management → expand Quota Templates → click on Create Quota Template… on the right-hand side panel as shown in the screenshot given below.
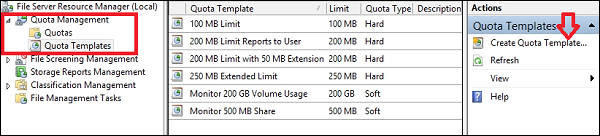
Quota Management
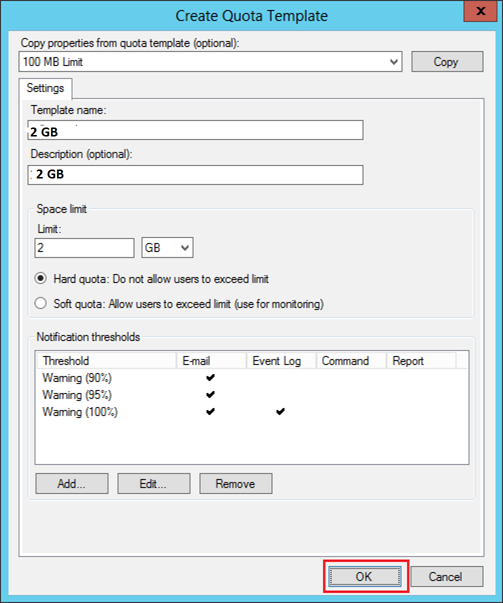
Step 3 − A new table will be opened, where the most important aspect to put is Space Limit depending on the need. Here, we will put 2GB and then → OK.
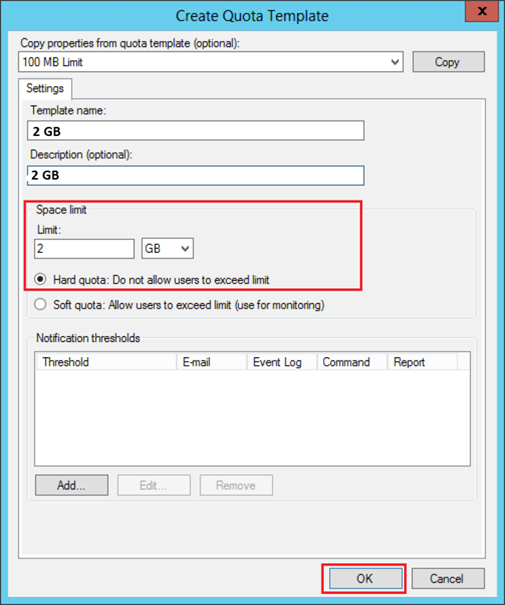
Space Limit
Step 4 − You must put the threshold for it and once the folder reaches the capacity, it will send you a notification where you will have an option to put the email.
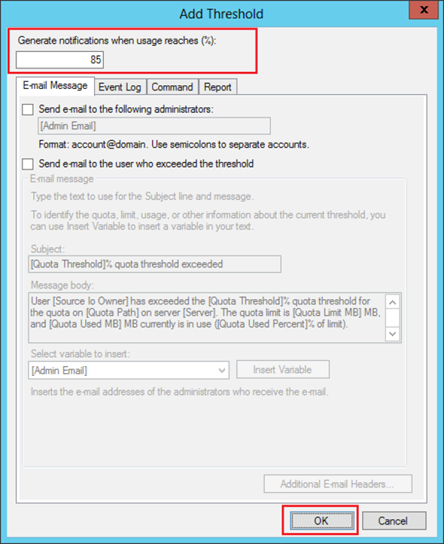
Threshold
Step 5 − Click Ok.
Limit
Step 6 − Then to attach this quota to a folder – Right Click on the template → click on Create Quota from Template…
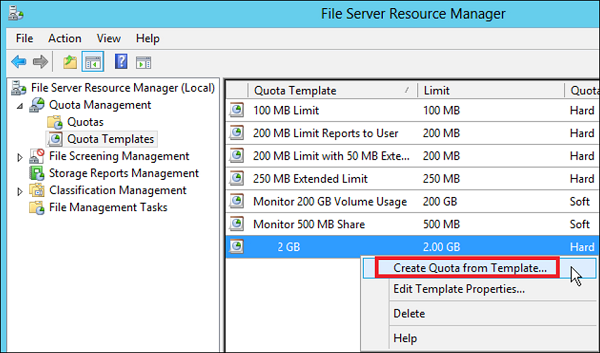
Create Quota
Step 7 − Click on Browse… and then select your folder → Create.
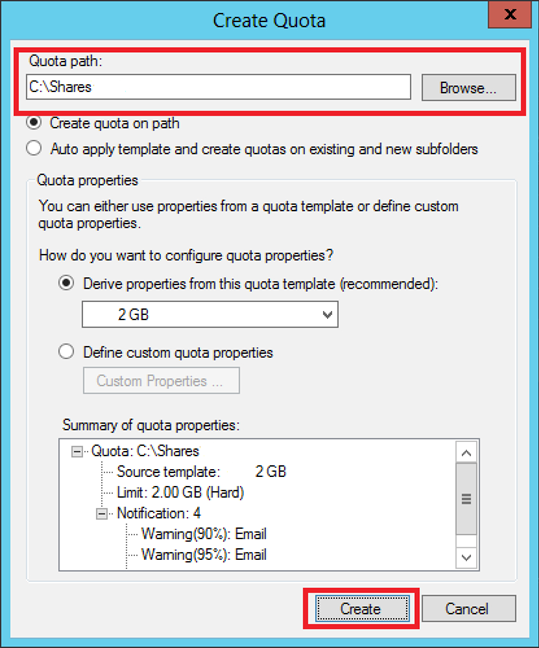
Click On Browser
Step 8 − To put a file restriction to your folders, you can go to the left pane File Screening Management → File screening templates → Click on the left panel Create File Screen Template…
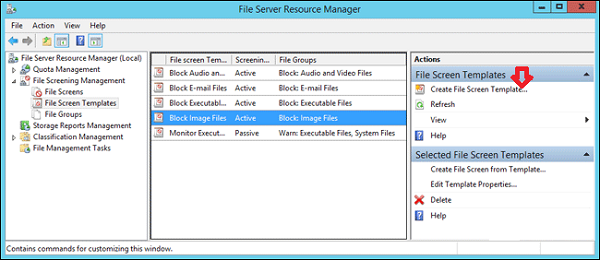
File Screening
Step 9 − Click on Browse… and find the folder that you want → Create.

Comments

Popular posts from this blog

Virtualization is one of the most important technology feature and Microsoft has invested on this and the responsible role is called as Hyper-V. Let us now see how to install the Hyper-V Role, for doing this we should follow the steps given below. Step 1  − To Install DNS role go to “Server Manager” → Manage → Add Roles and Features. Step 2  − Click Next. Step 3  − Select the  Role-based  or  feature-based installation  option → click Next. Step 4  − I will install a Local Hyper-V role as it will Select a server from the server pool → Next. Step 5  − From the Roles lists, check the Hyper-V Server role → click Add Features on the popup windows which show up and then → Next. Step 6  − Click Next. Step 7  − Choose your server’s physical network adapters that will take part in the virtualization → Next. Step 8  − Under  Migration , leave the default settings →  Next . Step 9  − Choose the...
The Windows Firewall with Advanced Security is a firewall that runs on the Windows Server 2012 and is turned on by default. The Firewall settings within Windows Server 2012 are managed from within the  Windows Firewall Microsoft Management Console . To set Firewall settings perform the following steps − Step 1  − Click on the Server Manager from the task bar → Click the Tools menu and select Windows Firewall with Advanced Security. Step 2  − To see the current configuration settings by selecting  Windows Firewall Properties  from the MMC. This  allows access to modify the settings  for each of the three firewall profiles, which are –  Domain, Private and Public  and IPsec settings. Step 3  − Applying custom rules, which will include the following two steps − Select either  Inbound Rules  or  Outbound Rules  under  Windows Firewall with Advanced Security  on the left side of the management console...
Windows Server 2012 codenamed Windows Server 8 is the most recent version of the operating system from Microsoft regarding server management. But it is not the last one, as the last one is Windows Server 2016. Officially it was released on August 1st, 2012 and is being sold as a commercial version only. Improvements in Windows Server 2012 The major Improvements on this version are as follows − It is ready to be integrated with cloud systems and it still can maintain the classic features of local datacenters as a result  Hyper-V Virtualization  has new features  Hyper-v replicas , it allows you to create virtual machines replications between clusters and storage systems. The  Storage migration  virtual disks can be moved to different physical storages, Virtual machine snapshots, virtual machines can be deleted from the Hyper-v and also from the virtual disks and it can be used directly without the need to shut down the virtual machine. The  Cor...