The controller as the name indicates controls the application. It acts like a bridge between models and views. Controllers handle request data, makes sure that correct models are called and right response or view is rendered. Methods in the controllers’ class are called actions. Each controller follows naming conventions. The Controller class names are in plural form, Camel Cased, and end in Controller − PostsController.
AppController
The AppConttroller class is the parent class of all applications’ controllers. This class extends the Controller class of CakePHP. AppController is defined at src/Controller/AppController.php. The file contains the following code.
<?php
   namespace App\Controller;
   use Cake\Controller\Controller;
   use Cake\Event\Event;

   class AppController extends Controller{
      public function initialize(){
         parent::initialize();
         $this->loadComponent('RequestHandler');
         $this->loadComponent('Flash');
      }
      public function beforeRender(Event $event){
         if (!array_key_exists('_serialize', $this->viewVars) &&
            in_array($this->response->type(), ['application/json', application/xml'])) {
            $this->set('_serialize', true);
         }
      }
   }
AppController can be used to load components that will be used in every controller of your application. The attributes and methods created in AppController will be available in all controllers that extend it. The initialize() method will be invoked at the end of controller’s constructor to load components.
Controller Actions
The methods in the controller class are called Actions. Actions are responsible for sending appropriate response for browser/user making the request. View is rendered by the name of action, i.e., the name of method in controller.
Example
class RecipesController extends AppController{
   public function view($id){
      // Action logic goes here.
   }
   public function share($customerId, $recipeId){
      // Action logic goes here.
   }
   public function search($query){
      // Action logic goes here.
   }
}
As you can see in the above example, the RecipesController has 3 actions − View, Share, and Search.
Redirecting
For redirecting a user to another action of the same controller, we can use the setAction() method. The following is the syntax for the setAction() method −
Syntax
Cake\Controller\Controller::setAction($action, $args...)
The following code will redirect the user to index action of the same controller.
$this->setAction('index');
The following example shows the usage of the above method.
Example
Make changes in the config/routes.php file as shown in the following program.
config/routes.php
<?php
   use Cake\Core\Plugin;
   use Cake\Routing\RouteBuilder;
   use Cake\Routing\Router;

   Router::defaultRouteClass('DashedRoute');
   Router::scope('/', function (RouteBuilder $routes) {
      $routes->connect('/redirectcontroller',['
         controller'=>'Redirects','action'=>'action1']);

      $routes->connect('/redirectcontroller2',['
         controller'=>'Redirects','action'=>'action2']);

      $routes->fallbacks('DashedRoute');
   });
   Plugin::routes();
Create a RedirectsController.php file at src/Controller/RedirectsController.php. Copy the following code in the controller file.
src/Controller/RedirectsController.php
<?php
   namespace App\Controller;
   use App\Controller\AppController;
   use Cake\ORM\TableRegistry;
   use Cake\Datasource\ConnectionManager;

   class RedirectsController extends AppController{
      public function action1(){
      }
      public function action2(){
         echo "redirecting from action2";
         $this->setAction('action1');
      }
   }
?>
Create a directory Redirects at src/Template and under that directory create a Viewfile called action1.ctp. Copy the following code in that file.
src/Template/Redirects/action1.ctp
This is an example of how to redirect within controller.
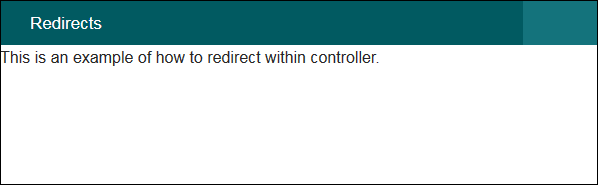
Execute the above example by visiting the following URL.
http://localhost:85/CakePHP/redirect-controller
Output
Upon execution, you will receive the following output.
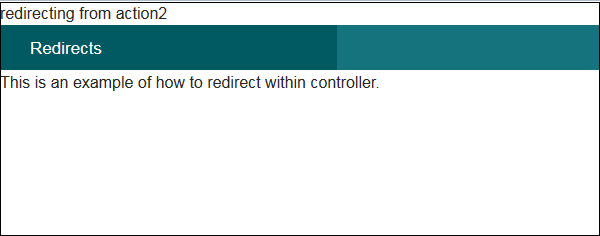
Now, visit the following URL − http://localhost:85/CakePHP/redirect-controller2
The above URL will give you the following output.
Loading Models
In CakePHP, a model can be loaded using the loadModel() method. The following is the syntax for the loadModel() method.
Syntax
Cake\Controller\Controller::loadModel(string $modelClass, string $type)
There are two arguments to the above function −
- The first argument is the name of model class.
- The second argument is the type of repository to load.
Example
If you want to load Articles model in a controller, then it can be loaded by writing the following line in controller’s action.
$this->loadModel('Articles');
Comments
Post a Comment