Take a look at the following screenshot. It shows the folder structure of CakePHP.
CakePHP Folder Structure
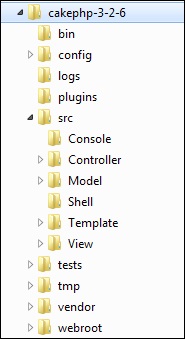
The following table describes the role of each folder −
S.NoFolder Name & Description
1
bin
The bin folder holds the Cake console executables.
2
config
The config folder holds the (few) configuration files CakePHP uses. Database connection details, bootstrapping, core configuration files and more should be stored here.
3
logs
The logs folder normally contains your log files, depending on your log configuration.
4
plugins
The plugins folder is where the Plugins your application uses are stored.
5
src
The src folder will be where you work your magic: It is where your application’s files will be placed. CakePHP’s src folder is where you will do most of your application development. Let’s look a little closer at the folders inside src.
  • Console Contains the console commands and console tasks for your application.
  • Controller Contains your application’s controllers and their components.
  • Locale Stores string files for internationalization.
  • Model Contains your application’s tables, entities and behaviors.
  • View Presentational classes are placed here: cells, helpers, and template files.
  • Template Presentational files are placed here: elements, error pages, layouts, and view template files.
6
tests
The tests folder will be where you put the test cases for your application.
7
tmp
The tmp folder is where CakePHP stores temporary data. The actual data it stores depends on how you have CakePHP configured, but this folder is usually used to store model descriptions and sometimes session information.
8
vendor
The vendor folder is where CakePHP and other application dependencies will be installed. Make a personal commitment not to edit files in this folder. We can’t help you if you’ve modified the core.
9
webroot
The webroot directory is the public document root of your application. It contains all the files you want to be publically reachable.

Comments

Popular posts from this blog

Virtualization is one of the most important technology feature and Microsoft has invested on this and the responsible role is called as Hyper-V. Let us now see how to install the Hyper-V Role, for doing this we should follow the steps given below. Step 1  − To Install DNS role go to “Server Manager” → Manage → Add Roles and Features. Step 2  − Click Next. Step 3  − Select the  Role-based  or  feature-based installation  option → click Next. Step 4  − I will install a Local Hyper-V role as it will Select a server from the server pool → Next. Step 5  − From the Roles lists, check the Hyper-V Server role → click Add Features on the popup windows which show up and then → Next. Step 6  − Click Next. Step 7  − Choose your server’s physical network adapters that will take part in the virtualization → Next. Step 8  − Under  Migration , leave the default settings →  Next . Step 9  − Choose the...

HaydarOrac

The Windows Firewall with Advanced Security is a firewall that runs on the Windows Server 2012 and is turned on by default. The Firewall settings within Windows Server 2012 are managed from within the  Windows Firewall Microsoft Management Console . To set Firewall settings perform the following steps − Step 1  − Click on the Server Manager from the task bar → Click the Tools menu and select Windows Firewall with Advanced Security. Step 2  − To see the current configuration settings by selecting  Windows Firewall Properties  from the MMC. This  allows access to modify the settings  for each of the three firewall profiles, which are –  Domain, Private and Public  and IPsec settings. Step 3  − Applying custom rules, which will include the following two steps − Select either  Inbound Rules  or  Outbound Rules  under  Windows Firewall with Advanced Security  on the left side of the management console...