CakePHP is an open source MVC framework. It makes developing, deploying and maintaining applications much easier. CakePHP has number of libraries to reduce the overload of most common tasks. Following are the advantages of using CakePHP.
  • Open Source
  • MVC Framework
  • Templating Engine
  • Caching Operations
  • Search Engine Friendly URLs
  • Easy CRUD (Create, Read, Update, Delete) Database Interactions.
  • Libraries and Helpers
  • Built-in Validation
  • Localization
  • Email, Cookie, Security, Session, and Request Handling Components
  • View Helpers for AJAX, JavaScript, HTML Forms and More

CakePHP Request Cycle

The following illustration describes how a Request Lifecycle works −
CakePHP Request Cycle
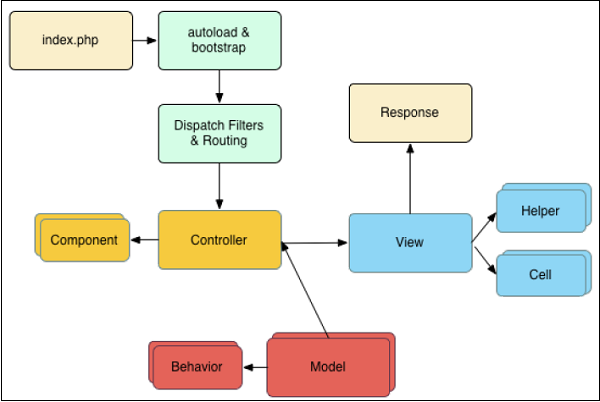
A typical CakePHP request cycle starts with a user requesting a page or resource in your application. At a high level, each request goes through the following steps −
  • The webserver rewrite rules direct the request to webroot/index.php.
  • Your application’s autoloader and bootstrap files are executed.
  • Any dispatch filters that are configured can handle the request, and optionally generate a response.
  • The dispatcher selects the appropriate controller & action based on routing rules.
  • The controller’s action is called and the controller interacts with the required Models and Components.
  • The controller delegates response creation to the View to generate the output resulting from the model data.
  • The view uses Helpers and Cells to generate the response body and headers.
  • The response is sent back to the client.

Comments

Popular posts from this blog

The Windows Firewall with Advanced Security is a firewall that runs on the Windows Server 2012 and is turned on by default. The Firewall settings within Windows Server 2012 are managed from within the  Windows Firewall Microsoft Management Console . To set Firewall settings perform the following steps − Step 1  − Click on the Server Manager from the task bar → Click the Tools menu and select Windows Firewall with Advanced Security. Step 2  − To see the current configuration settings by selecting  Windows Firewall Properties  from the MMC. This  allows access to modify the settings  for each of the three firewall profiles, which are –  Domain, Private and Public  and IPsec settings. Step 3  − Applying custom rules, which will include the following two steps − Select either  Inbound Rules  or  Outbound Rules  under  Windows Firewall with Advanced Security  on the left side of the management console...
In this chapter, we will see how to configure WSUS and tune it. The following steps should be followed for configuring it. Step 1  − When you open it for the first time, you should do it by going to “Server Manager” → Tools → Windows Server Update Services, then a Configuration wizard will be opened and then click → Next. Step 2  − Click “Start Connecting” → Wait until the green bar is full and then → Next. Step 3  − Check the box for which the updates want to be taken, I did for English and then → Next. Step 4  − Check the box for all the products which you want to update. It is just for Microsoft products and it is recommended to include all the products related to Microsoft and then → Next. Step 5  − Choose the classification updated to be downloaded, if you have a very good internet speed, then check all the boxes, otherwise just check “Critical Updates”. Step 6  − Now we should schedule the updates which I will recommend to do it a...
In this chapter, we will see how to enable remote desktop application. It is important because this enables us to work remotely on the server. To do this, we have the following two options. For the first option, we have to follow the steps given below. Step 1  − Go to Start → right click “This PC” → Properties. Step 2  − On Left side click “Remote Setting”. Step 3  − Check radio button “Allow Remote connection to this computer” and Check box “Allow connection only from computers running Remote Desktop with Network Level Authentication (recommended)” → click “Select Users”. Step 4  − Click Add. Step 5  − Type user that you want to allow access. In my case, it is administrator → click OK. For the  second option , we need to follow the steps given below. Step 1  − Click on “Server Manage” → Local Server → click on “Enable” or Disable, if it is Disabled.