CakePHP comes with one configuration file by default and we can modify it according to our needs. There is one dedicated folder “config” for this purpose. CakePHP comes withdifferent configuration options.
General Configuration
The following table describes the role of various variables and how they affect your CakePHP application.
| S.No | Variable Name & Description |
|---|---|
| 1 |
debug
Changes CakePHP debugging output.
false = Production mode. No error messages, errors, or warnings shown.
true = Errors and warnings shown.
|
| 2 |
App.namespace
The namespace to find app classes under.
|
| 3 |
App.baseUrl
Un-comment this definition if you don’t plan to use Apache’s mod_rewrite with CakePHP. Don’t forget to remove your .htaccess files too.
|
| 4 |
App.base
The base directory the app resides in. If false, this will be auto detected.
|
| 5 |
App.encoding
Define what encoding your application uses. This encoding is used to generate the charset in the layout, and encode entities. It should match the encoding values specified for your database.
|
| 6 |
App.webroot
The webroot directory.
|
| 7 |
App.wwwRoot
The file path to webroot.
|
| 8 |
App.fullBaseUrl
The fully qualified domain name (including protocol) to your application’s root.
|
| 9 |
App.imageBaseUrl
Web path to the public images directory under webroot.
|
| 10 |
App.cssBaseUrl
Web path to the public css directory under webroot.
|
| 11 |
App.jsBaseUrl
Web path to the public js directory under webroot.
|
| 12 |
App.paths
Configure paths for non-class based resources. Supports the plugins, templates, locales subkeys, which allow the definition of paths for plugins, view templates and locale files respectively.
|
| 13 |
Security.salt
A random string used in hashing. This value is also used as the HMAC salt when doing symmetric encryption.
|
| 14 |
Asset.timestamp
Appends a timestamp which is last modified time of the particular file at the end of asset files URLs (CSS, JavaScript, Image) when using proper helpers. Valid values −
|
Databases Configuration
Database can be configured in config/app.php file. This file contains a default connection with provided parameters which can be modified as per our choice. The below screenshot shows the default parameters and values which should be modified as per the requirement.
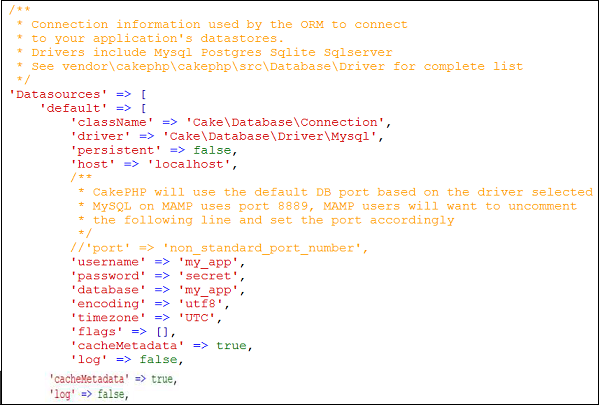
Let’s understand each parameter in detail −
| S.NO | Key & Description |
|---|---|
| 1 |
className
The fully namespaced class name of the class that represents the connection to a database server. This class is responsible for loading the database driver, providing SQL transaction mechanisms and preparing SQL statements among other things.
|
| 2 |
driver
The class name of the driver used to implements all specificities for a database engine. This can either be a short classname using plugin syntax, a fully namespaced name, or a constructed driver instance. Examples of short classnames are Mysql, Sqlite, Postgres, and Sqlserver.
|
| 3 |
persistent
Whether or not to use a persistent connection to the database.
|
| 4 |
host
The database server’s hostname (or IP address).
|
| 5 |
username
Database username
|
| 6 |
password
Database password
|
| 7 |
database
Name of Database
|
| 8 |
port (optional)
The TCP port or Unix socket used to connect to the server.
|
| 9 |
encoding
Indicates the character set to use when sending SQL statements to the server like ‘utf8’ etc.
|
| 10 |
timezone
Server timezone to set.
|
| 11 |
schema
Used in PostgreSQL database setups to specify which schema to use.
|
| 12 |
unix_socket
Used by drivers that support it to connect via Unix socket files. If you are using PostgreSQL and want to use Unix sockets, leave the host key blank.
|
| 13 |
ssl_key
The file path to the SSL key file. (Only supported by MySQL).
|
| 14 |
ssl_cert
The file path to the SSL certificate file. (Only supported by MySQL).
|
| 15 |
ssl_ca
The file path to the SSL certificate authority. (Only supported by MySQL).
|
| 16 |
init
A list of queries that should be sent to the database server as when the connection is created.
|
| 17 |
log
Set to true to enable query logging. When enabled queries will be logged at a debug level with the queriesLog scope.
|
| 18 |
quoteIdentifiers
Set to true if you are using reserved words or special characters in your table or column names. Enabling this setting will result in queries built using the Query Builder having identifiers quoted when creating SQL. It decreases performance.
|
| 19 |
flags
An associative array of PDO constants that should be passed to the underlying PDO instance.
|
| 20 |
cacheMetadata
Either boolean true, or a string containing the cache configuration to store meta data in. Having metadata caching disable is not advised and can result in very poor performance.
|
Comments
Post a Comment