In Windows 2012, creating account OU and group is nearly the same as in the previous versions.
To Create an OU user, please follow the steps given below.
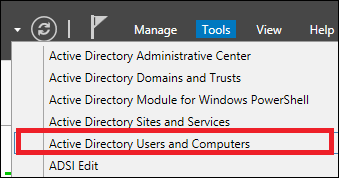
Step 1 − Go to: Server Manager → Tools → Active Directory Users and Computers.
Active Directory Users
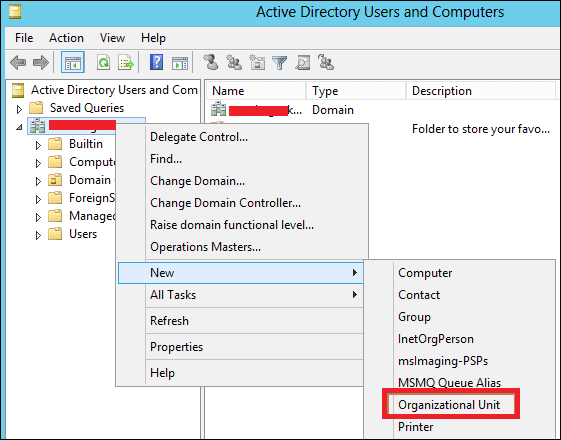
Step 2 − To create an OU named Management. Right-click domain in Active Directory Users and Computers, choose New and click Organizational Unit.
Organizational Unit
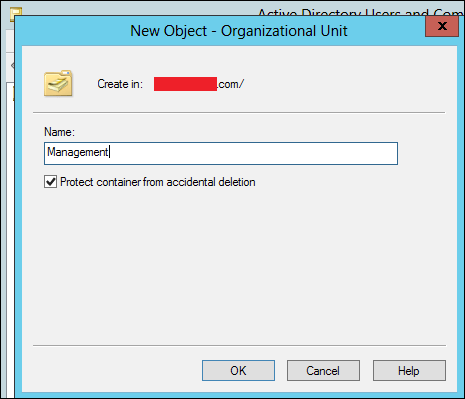
Step 3 − Type Management to name the OU. Check the Protect container from accidental deletion option. This option will protect this object from accidental deletion.
Management
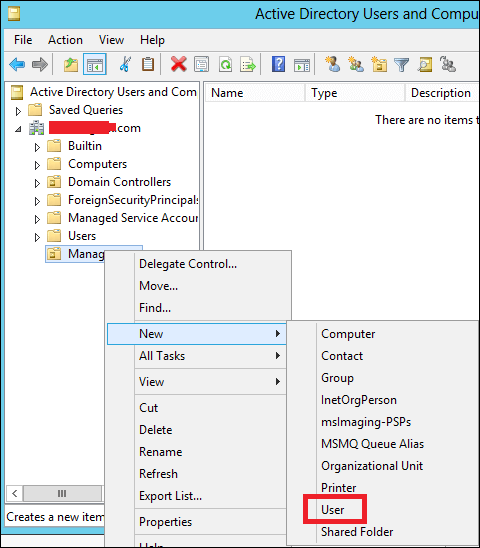
Step 4 − To create a user, Right-click on the Management OU → click New → and then click User.
User
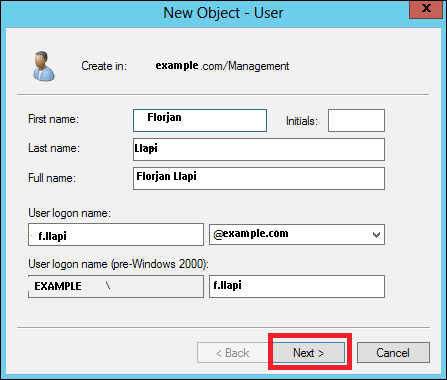
Step 5 − Complete the field with the data of the users → then click Next.
Data User
Step 6 − Now type-in the password. Check on the tick box → User must change password at next logon. The user will be forced to change the password when the user logs in → Click Next → and then click Finish.

Comments

Popular posts from this blog

The Windows Firewall with Advanced Security is a firewall that runs on the Windows Server 2012 and is turned on by default. The Firewall settings within Windows Server 2012 are managed from within the  Windows Firewall Microsoft Management Console . To set Firewall settings perform the following steps − Step 1  − Click on the Server Manager from the task bar → Click the Tools menu and select Windows Firewall with Advanced Security. Step 2  − To see the current configuration settings by selecting  Windows Firewall Properties  from the MMC. This  allows access to modify the settings  for each of the three firewall profiles, which are –  Domain, Private and Public  and IPsec settings. Step 3  − Applying custom rules, which will include the following two steps − Select either  Inbound Rules  or  Outbound Rules  under  Windows Firewall with Advanced Security  on the left side of the management console...
The IIS ( Internet Information Services ) is facing internet all the time. So, it is important to follow some rules in order to minimize the risk of being hacked or having any other security issues. The first rule is to take all the updates of the system regularly. The second one is to create different application polls to this, which can be done by following the steps shown below. Step 1  − You have to go to: Server Manager → Internet Information Services(IIS) Manager → Application Pulls. Step 2  − Click “Sites” → Right Click “Default Website” → Manage Website → Advance Settings. Step 3  − Select the Default Pools. Step 4  − Disable the OPTIONS method, this can be done by following the path – Server Manager → Internet Information Services (IIS) Manager → Request Filtering. Step 5  − In the action pane, select "Deny Verb" → Insert ‘OPTIONS’ in the Verb → OK. Step 6  − Enable Dynamic IP Restrictions blocks by going to – IIS Manager → Double...
In this chapter, we will see how to enable remote desktop application. It is important because this enables us to work remotely on the server. To do this, we have the following two options. For the first option, we have to follow the steps given below. Step 1  − Go to Start → right click “This PC” → Properties. Step 2  − On Left side click “Remote Setting”. Step 3  − Check radio button “Allow Remote connection to this computer” and Check box “Allow connection only from computers running Remote Desktop with Network Level Authentication (recommended)” → click “Select Users”. Step 4  − Click Add. Step 5  − Type user that you want to allow access. In my case, it is administrator → click OK. For the  second option , we need to follow the steps given below. Step 1  − Click on “Server Manage” → Local Server → click on “Enable” or Disable, if it is Disabled.